

POSES FOR STRENGTH AND MOBILITY
For swimmers, a regular yoga practice can provide incredible physical benefits such as increased flexibility, agility, and strength. As athletes who execute the same movements day after day, it's critical to be conscious of our movement patterns and add exercise into our training that can help us perform better and avoid injury. Although yoga has numerous physical benefits for swimmers, I believe the mental benefits have the most potential to improve performance.
By enhancing awareness, mind-body connection, focus, and resilience, yoga and meditation can assist athletes develop their attitude. It's also a terrific way to assist relieve and respond to bodily and emotional stress.

Here are a few things to think about as you begin your yoga journey:
- Props are your ally! Using props is not cheating, and it does not imply that you are weak or inept at yoga. Props aid in the safe and successful execution of the poses.
- Forcing yourself into a position earns you nothing. Each of us has our own set of limitations and abilities. Pay attention to your body and pay attention to what it's telling you!
- Concentrate on your breathing. Pay attention to the quality of your breath. You've gone too far if you're holding your breath or it feels limited in a pose. Extend the length of your exhales to see if you can pull back, readjust, and gently move deeper.
The breath was not cued with movement on purpose.
Linking breath and movement cues can be daunting for beginners, in my experience. To begin, simply take a few deep breaths. As your yoga practice progresses, you'll be able to integrate more specialized breath exercises.
STRETCH YOUR TOES.

It's easy to overlook our feet, but they're crucial to our swimming success. Flexible, mobile ankles aid in propelling you through the water with a powerful kick, and the mobility of your big toe is vital for ankle range of motion. In addition, because the foot position is the polar opposite of the dolphin and flutter kicks, it gives a great counterpoint, especially if you have foot cramps.
The toe stretch focuses on the muscles and connective tissue of the foot's sole.
How to do it:
Tuck your toes beneath and get down on your hands and knees. Don't forget about your small toes; they may require assistance to tuck beneath. Walk your hands towards your knees as you gently sit your hips back over your heels. Staying here with your hands on the floor is an option. To advance, sit up straight with your hands on your thighs and your complete body weight on your heels. Sit tall and take a deep breath.
This stance can be strenuous! It's fine if you can only sit for five breaths at start. Begin where you are and work your way up to 1-2 minutes. There's a vast difference between being uncomfortable and being in pain. Stop if you have sharp discomfort in your knees, ankles, or feet.
VARIATION IN COW FACE POSE

Swimming's repetitive nature can lead to muscular imbalances, particularly around the shoulder joint. Cow Face Pose uses a mix of internal and exterior rotation to stretch the muscles surrounding the shoulder. If you have a rotator cuff injury, avoid this pose if you notice a difference between your sides.
How to do it:
Take a seat in a comfortable position. Sit on your heels with the tops of your feet flat on the floor for extra ankle mobility work. I elected to sit in a modified hero's pose, with my knees together and my feet somewhat wider than my hips, on a block. Choose a sitting position that allows you to sit tall and comfortably with a long spine.
Parallel to the floor, extend your arms out to the side. Rotate your left arm externally with your palm facing ahead and your thumb pointing up. Rotate your right arm internally, palm facing behind you and thumb pointing down.
Reach up with your left arm, bending at the elbow to place your left hand between your shoulder blades, palm facing back. Reach down with your right arm, bending at the elbow and placing your hand (palm facing away from you) between your shoulder blades. Clasp your hands if at all possible. I strongly advise utilizing a strap to expand your reach if your shoulders are tight. Hold for 10 breaths, then switch sides and repeat.
PUPPY POSE EXTENDED


The spine, upper back, shoulders, and chest are all stretched in extended puppy stance.
Start on all fours with your shoulders placed over your wrists and your hips over your knees. The tops of your feet should be evenly pressed down.
As you bring your forehead down onto the mat, walk your hands out in front of you. Maintain a healthy hip-to-knee ratio. Reach out your arms in front of you, at least shoulder distance apart. Keep your hands slightly broader if your shoulders are uncomfortable or tense. The hands are pressed into the mat. To help produce a broadening in the upper back, the biceps roll out and the triceps move in. The chest sinks into the carpet. Hold the position for 5-10 breaths.
***It's fine if your forehead doesn't contact the mat! Maintain a straight spine with your neck and head, and your ears in-between your upper arms. You can rest your forehead on a blanket or a block.
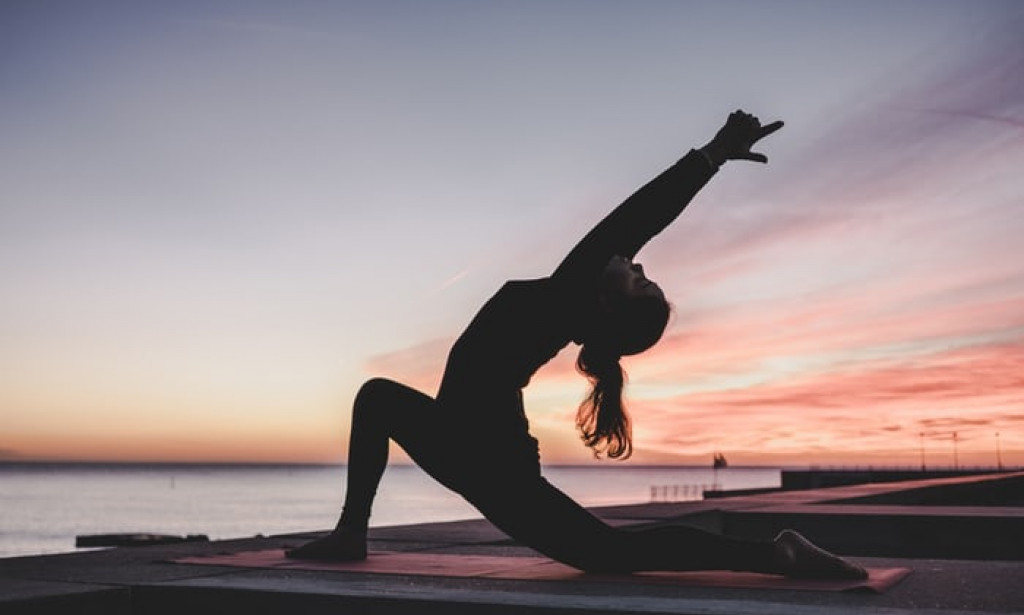
VARIATION OF THE LOW LUNGE

My favorite lunge variant for opening up the front of the hip is this one. It's simple and straightforward to add into a post-practice recuperation routine.
How to do it:
With your right leg forward and both hands on your hips, come into a low lunge. Stack your hips over your left knee. Pull your tailbone down and engage your left glute lightly. Maintain a long spine by drawing in your lower belly and rising up to the sky with the crown of your head. Maintain the lift in your pelvis and the little glute engagement by pressing your hips forward. Make a forward reach with your right hand.
Grasp your knee/thigh with the back of your hand. By squeezing your thigh against your hand, you can resist the pressure from your hand (this is a VERY minor engagement, and your knee should remain stacked over your ankle). Reaching up and over to the right with the left arm. Stay here for 5-10 breaths and then switch sides.
POSE OF SUPINE BOUND ANGLE

If you're only going to attempt one posture, make it this one! This is, without a doubt, my fave. Supine Bound Angle Pose opens the hips and chest while stretching the inner thighs.
How to do it:
Get your props together: two blocks and a bolster. If you don't have any yoga props, you can make do with rolled towels or blankets, as well as cushions.
Place the bolster behind your hips/back and begin in a seated position. Bring your feet together, open your knees, and place blocks under your thighs. Lay down on the bolster with care. Arms outstretched to shoulder height, palms facing up
Make any necessary adjustments to ensure that you feel properly supported...
If you're having trouble with your hips, provide extra support under your thighs. Remove the bolster if lying on it is too much for your back, or if you can't relax your arms onto the ground.
Stay for at least 3-5 minutes, giving special attention to your breathing.
With each exhale, see if you can go a bit deeper. Enjoy!

You must be logged in to post a comment.